|
|
Post by ecbill on Dec 27, 2020 19:48:56 GMT -7
|
|
|
|
Post by hairycanary on Dec 27, 2020 22:20:49 GMT -7
Bill looks like you have a good start. If you cast it with the grill and head lights in it, make sure all the cracks and spaces are sealed up good. That mold rubber finds it’s way through the smallest places. Good Luck !! Have Fun !! Rick |
|
|
|
Post by AJR on Dec 28, 2020 8:48:51 GMT -7
Bill I second what Rick said about filling the gaps. I use 30 minute epoxy from the back side to do that. It will flow into the gaps without going all the way through. Also remember that ANY and ALL imperfection will show in your molds. I would love to have one if you offer any for sale. Keep us updated and thanks for posting. Beware.......there is no cure for what you are about to get yourself into! |
|
|
|
Post by dave632 on Dec 28, 2020 9:55:19 GMT -7
Great choice for a casting Bill.
|
|
|
|
Post by hilltopspeedway on Dec 28, 2020 10:05:30 GMT -7
Ahhhh, the addiction begins...!!! Noticed you fixed the hood dimple...!!! Unless you want a three point roll bar, I would fill in the third hole in the thingypit, I can't tell if you did or not. You can always drill it back out in the new casting... The reason being, if you check around, you can find some chrome paperclips that make great rollbars...just a lot easier IMO, but opinions will vary...As stated, your casting will be no better than the master, so double check and wipe off those finger prints before pouring... I would suggest a pressure pot for making your mold and casting... bodies just come out nicer... Hope this helps...RM
P.S. Be sure and cover up the body holes from the inside...just put some tape over the holes before you put in the clay, keeps the holes clean...
|
|
|
|
Post by ecbill on Dec 28, 2020 10:29:51 GMT -7
Thanks guys. Wasn’t sure if I would cast it with the bumper/ grill installed or separate. Will use the grill from the original yellow Afx. Not as clunky as the JL. Have 2 choices for hoods. Will probably use this one rather than cast separately. Will have to fill the seams a little better.
Randy, thanks for the tip on the paper clip roll bar. I would like to try to cast some roll bars to use when converting stock hardtops. Yep, filled the dimple and roll bar holes. Customs will use a different type of roll bar.
|
|
|
|
Post by ecbill on Dec 31, 2020 15:27:29 GMT -7
|
|
|
|
Post by AJR on Dec 31, 2020 18:14:16 GMT -7
I do 60psi for molds and 45psi for casting. |
|
|
|
Post by GTS on Dec 31, 2020 18:22:34 GMT -7
I'm no expert but have been using 60 #'s for my molds & resin pours. Works good for me. I am using that same HF pressure pot. I made another lid for it and use as a vacuum pot also. Works for me.
Pressure pot.
Vacuum pot.
|
|
|
|
Post by ecbill on Dec 31, 2020 19:12:08 GMT -7
Thanks guys! When do you apply vacuum?
|
|
|
|
Post by GTS on Jan 1, 2021 7:50:03 GMT -7
Thanks guys! When do you apply vacuum? First off, I use "Smooth-On" products, which may account for why I do things the way I do. Plus I use some of Jeff's excellent tutorials, only modifying to suit my needs. There are numerous "how-to" videos on the Smooth-On web site, which I found helpful, also.
After I mix up the silicone for making a mold, I put that container in the "vacuum pot". I apply the vacuum and it pulls the air out of the mix (fascinating). I let that run for 2 to 3 minutes (ymmv), shut down the vacuum pump, pull the lid, grab the container of silicone and slowly start to pour the mold. I understand you can do the same procedure with your resin pours but you don't have that luxury of set up time with it, so I've never tried it. In short; I only use the vacuum pot when pouring silicone molds.
Hope this helps 
PS: I'll get together some other info & links I found helpful and try to get that sent to you in the next day or two.
|
|
Deleted
Deleted Member
Posts: 0
|
Post by Deleted on Jan 1, 2021 17:41:11 GMT -7
all good info.
hoping you have success
|
|
|
|
Post by hairycanary on Jan 1, 2021 23:34:22 GMT -7
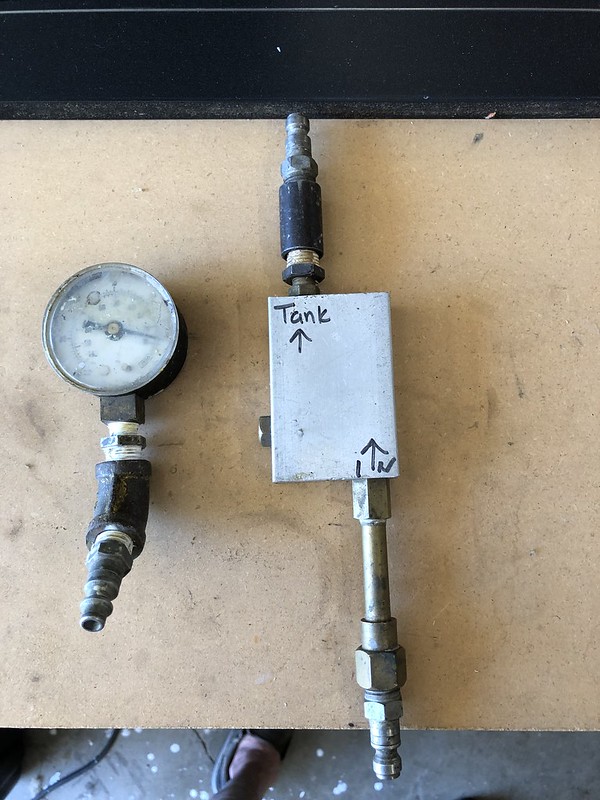
Bill I also use my pressure pot both ways. I vacuum the rubber before I pour it in the mold box's. That's the only time time I vacuum anything. If you have a air compressor and you want to save money getting started, I got one of these air operated vacuum pump's at harbor freight for about $10. I took the skin off and that's what it looks like. It's ugly but works really good. Been using that same one since I started casting. I plug the vacuum gauge in when I'm vacuuming and un plug it under pressure. Then I use pressure after I pour the resin in the molds and that's it. Hope that helps ? Rick  Untitled Untitled by rick williamson, on Flickr  Untitled Untitled by rick williamson, on Flickr |
|