Deleted
Deleted Member
Posts: 0
|
Post by Deleted on Dec 1, 2008 18:46:26 GMT -7
Do a quick web search and you will find designs for a vacuum former that cost just a few bucks to build. It's actually very easy to do I want to try to vacuform windows in the future, but since I don't have a vacuform machine, and funds are low, that will have to wait  ;D. |
|
L_Brown
Pro Stock
   Larry Brown - North Texas
Posts: 347
|
Post by L_Brown on Dec 13, 2008 9:12:27 GMT -7
Sam, how are the wheelie bars mounted.
|
|
|
|
Post by SKR on Dec 13, 2008 9:20:48 GMT -7
|
|
|
|
Post by rapidrichard on Dec 13, 2008 11:33:04 GMT -7
R/T Racing is at the PRI Show In Orlando Lots Of Hard Core Racing Products Here   Richard/Tom |
|
|
|
Post by rapidrichard on Dec 13, 2008 11:38:59 GMT -7
I Vote NO JUICE AND SO DOES TOM
R/T RACING
|
|
|
|
Post by johnbalich on Jan 30, 2009 17:50:32 GMT -7
ok heres a dumbo question......I don't want to overlook the obvious.
I got my wizzard tires from lucky bobs. The axle openings on the wheels are too tight a fit on the Tomy axle...........do you grind the axle or ream the wheel?? I don't want to end up with wobblies!
|
|
|
|
Post by SKR on Jan 31, 2009 22:15:56 GMT -7
Hey John, You can ream it a little just to get it started if it's a tight fit and.... as I'm sure you know, make sure everything looks square before you start to press them on. I would avoid grinding on the axle.
|
|
|
|
Post by johnbalich on Feb 6, 2009 17:18:57 GMT -7
i did a work around................i found a liflike axle that fit snugly.....i ended up reaming the pinion gear slightly as well, to get a fit. I had to cobble up the pinion spacer/guide by modifying a lifelike part. This was a very cool build and took me out of my previous comfort zone. I am still not sure how I got the motor, magnets, motor bearing, pickup shoes hangers etc etc to line up and snap together!!! what is your guys method.
The chassis is done the body is in the paint shop.....
|
|
|
|
Post by johnbalich on Feb 7, 2009 10:09:01 GMT -7
Thanks again for this great series build up. I really enjoyed building my first inline racer, and learned a lot. Don't know how it will perform but I am anxious to be part of the field. The car may still have a primer spot or two, but I think you will forgive that as 'a work in progress'.
One thing I find very appealing about MM/PS is that basically all 'commercial grade' inlines race heads up. Kinda like Ford vs Chevy vs Mopar. Another appeal of HO racing in general, let's face it, the basic cars are a bargain!
|
|
Deleted
Deleted Member
Posts: 0
|
Post by Deleted on Oct 14, 2009 20:34:46 GMT -7
There has been an update on the BSRT Armature Part #'s as well as details. The armature that is listed at the beginning of this build is part # BSRT140. That part # is still valid except it is balanced, cut and epoxied now and sells for $18. The replacement # for the std. High Power arm is BSRT936 and is the same arm that was originally listed here and sells for $8.00.
|
|
|
|
Post by SKR on Oct 15, 2009 7:55:29 GMT -7
Thanks for the update. I'll change the part #'s
|
|
|
|
Post by johnbalich on Oct 18, 2009 16:24:04 GMT -7
MM/PS is a "keeper!" Expect much news on the MM/PS front as well as inline racing generally. They are cheap, plentiful, and probably more consistent runners. Stress not, NTRA will Not abandon the beloved T Jet platform!
|
|
|
|
Post by SKR on Oct 24, 2009 5:07:58 GMT -7
|
|
|
|
Post by rickvoegelin on Oct 30, 2009 13:44:25 GMT -7
I'm trying to get up to speed on inline MM/PS cars, and I'm struggling with reassembling the armature/magnets/end bell into the chassis.
What's the best technique for getting the assembly back into the chassis while maintaining good electrical contact on the "ears" on the end bell and not bending the shoe hangers?
All advice much appreciated!
Rick V.
|
|
|
|
Post by SKR on Oct 30, 2009 21:02:43 GMT -7
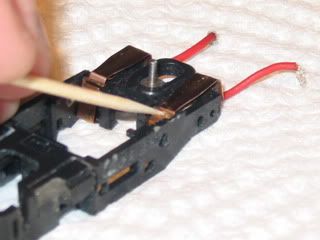
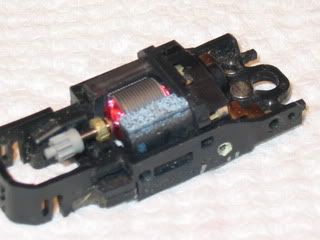
ahhhhhhhh I remember my first time. Didn't like the set up at all and thought these chassis were a pain in the rear compared to a 440-X2. Now it's the opposite. It becomes much easier after a few rebuilds and a few beers  . What I like to do is take the pick up shoes off. The easiest way to remove the shoes that I've found is to take a tooth pick and push down and forward on the shoe right in front of the shoe hanger.  Install the motor from the top. Guide the rear of the motor down first so you can line up the rear bushing as you push it down. Once you get the front of the motor started in the chassis, make sure the shoe hangers are not in the way. If the hangers get in the way, use your tooth pick and adjust them as you apply a little down pressure on the front of the motor. Just enough so that the hangers clear the front. Take a look at your rear bushing and make sure it is still lined up. At this time you should be able to push the motor down completely. Motor is propped up ready for the final install. Note that the shoe hangers are in correct position.  Once you have your motor in. Replace your pick up shoe springs and pick up shoes. Easiest way to replace the pick up shoes is to come in from the front. Press down on the P/U spring with the shoe as you move the shoe back toward the rear P/U hanger. You should be able to slide the shoe into the hanger as long as you have down pressure on the shoe. Hope this helps Rick. Sam |
|