|
|
Post by AJR on Feb 5, 2020 4:54:00 GMT -7
Nice tutorial Jeff, I like the body. What do you put on the Qtip to smooth clay and clean body? Thanks Robert. I don't use anything on the Qtip. The residue on the body I just wipe off with the Qtip. It allows me to clean all the way to the edges without disturbing the clay. When I'm working the clay, I use the end of the Qtip and kind of hammer the clay into the shape or smoothness I want. Using a tapping motion with the end of the Qtip. I will take another picture showing this before I mold it up. |
|
|
|
Post by cozee on Feb 5, 2020 6:49:25 GMT -7
Excellent craftsmanship. Looking forward to seeing it completed!
|
|
|
|
Post by dave632 on Feb 5, 2020 15:09:33 GMT -7
Lots of work there.
|
|
|
|
Post by AJR on Feb 7, 2020 7:30:05 GMT -7
I have done the accessories the same way with a shallow clay base. These steps with the clay, etc. will make more sense when I do part two of the mold. Normally my scoop and blower type accessories are done in a one part mold, but I'm trying something different. Windows have to be a two part mold.


A thin layer clay base basically to just hold them in place.


These are the Lego molds. I have 3 of each that I have been using since I started. These will be hot glued to the plexiglas for pouring.
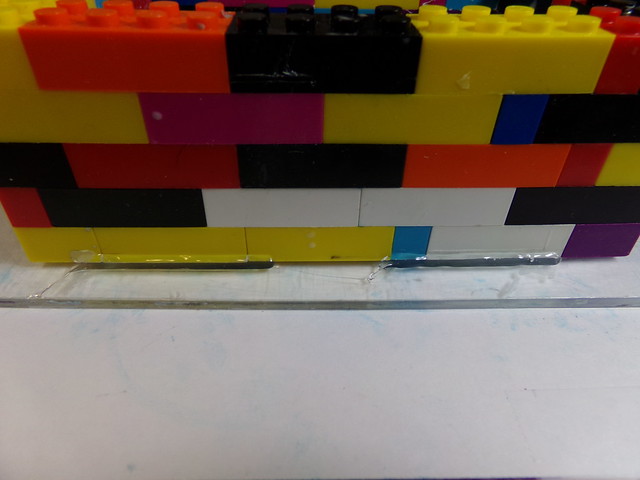
The hot glue is enough to hold the mold in place but breaks off easy when I'm done. It also does not have to go all the way around. Just enough to hold is all that's needed.
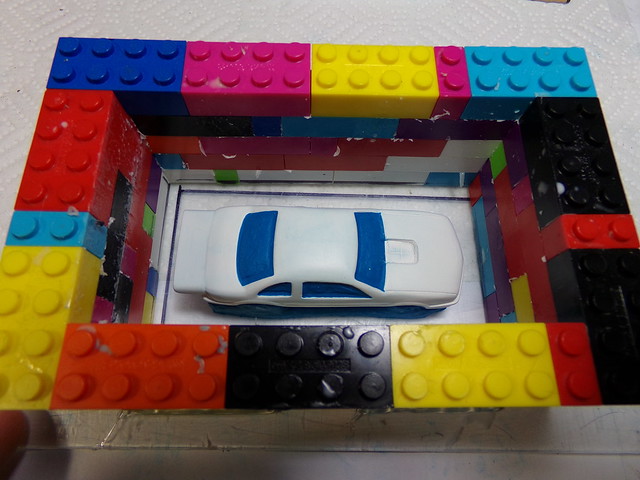

Ready for the first pour. I will do that today. That much closer to a new body!  
|
|
|
|
Post by dave632 on Feb 7, 2020 9:20:32 GMT -7
I had no idea how much went into making one of these bodies.
|
|
|
|
Post by AJR on Feb 7, 2020 9:42:40 GMT -7
I had no idea how much went into making one of these bodies. Yes lots of steps, but remember this one is the extreme. There was a lot more tooling on the body because everything was a mess with that particular die cast. I get my reward when that first body comes out of the mold. Almost there. It's more about time now. The mold material I am using takes 24hrs to cure for a total of 48hrs for a two part mold. After that.......if everything goes good, I will make the first casting. I have only had one mold go bad. I don't like to waste material so I'm pretty careful. Lots of things could go wrong though. |
|
|
|
Post by ecbill on Feb 7, 2020 12:19:31 GMT -7
I had no idea how much went into making one of these bodies. Yes lots of steps, but remember this one is the extreme. There was a lot more tooling on the body because everything was a mess with that particular die cast. I get my reward when that first body comes out of the mold. Almost there. It's more about time now. The mold material I am using takes 24hrs to cure for a total of 48hrs for a two part mold. After that.......if everything goes good, I will make the first casting. I have only had one mold go bad. I don't like to waste material so I'm pretty careful. Lots of things could go wrong though. This is very educational. Hoping you’ll show us how you align the two mold halves when you cast. |
|
|
|
Post by AJR on Feb 7, 2020 12:22:50 GMT -7

Everything is ready to pour the first mold. I use Smooth On products exclusively and Mann mold release. The Mold Max 20 gives me plenty of working time versus cure time. I did not take step by step pictures here because there is really not enough time and I am by myself so no one can take them while I'm doing it. This mold material has to be weighed in at a 10:1 ratio. 10 Parts A to 1 Part B. I use a digital scale to achieve this. I spray the molds with mold release and make sure everything gets covered. Don't want to use too much. *NEVER SPRAY MOLD RELEASE IN YOUR PAINTING AREA* Let that sit for at least 5 minutes before pour. I mix the material then put it in the vacuum chamber and let it boil the air out of it at about 28"- 30"hg for approx. 2 minutes. Material is then poured into each mold at a slow rate as to not introduce air into the material. It is typically poured into one corner and is allowed to fill in around the object till required level is reached. Then they are ready for the pressure pot at 60psi for the next 24 hrs. First pours are complete. I will take them out tomorrow at 1pm and I will see what I've got. |
|
|
|
Post by AJR on Feb 7, 2020 12:26:05 GMT -7
Yes lots of steps, but remember this one is the extreme. There was a lot more tooling on the body because everything was a mess with that particular die cast. I get my reward when that first body comes out of the mold. Almost there. It's more about time now. The mold material I am using takes 24hrs to cure for a total of 48hrs for a two part mold. After that.......if everything goes good, I will make the first casting. I have only had one mold go bad. I don't like to waste material so I'm pretty careful. Lots of things could go wrong though. This is very educational. Hoping you’ll show us how you align the two mold halves when you cast. The alignment part comes in the second half. There will be notches cut into the first half before pouring the second. |
|
|
|
Post by AJR on Feb 8, 2020 15:02:25 GMT -7

The first half of the Beretta molds are out of the pressure pot. I will now break loose the hot glue beads and remove the first halves from the Lego boxes.

This is a look through the plexiglas. This will actually be the top of the first half.

Here is the first half mold removed. Now I need to remove the clay and body.

Clay and body removed. See the detail in the mold. If you click on the picture it will take you to Flikr where you can enlarge it further.
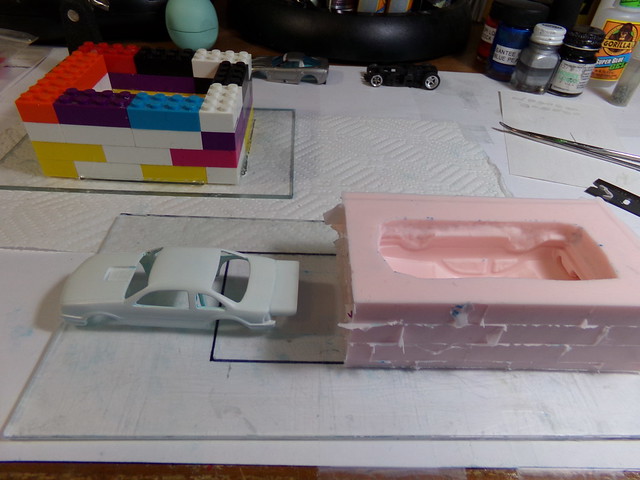
Now I have removed all of the clay from the body and cleaned it up. The body will be reinserted into the mold for the second half pour.
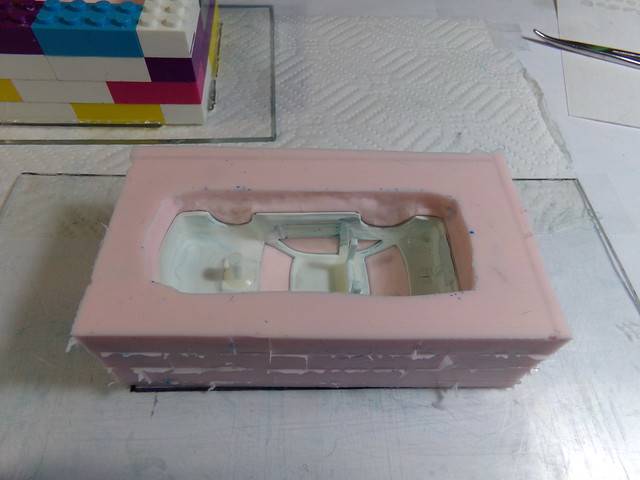
Body back in the mold. It is very important that the body is sitting perfectly in it's impression.

I cut several "V" notches in the sides for alignment purposes when casting.

I do the same thing with the accessories to get to this point.

Now both mold halves are reinserted back into the Lego mold boxes for pouring the second half. I reglue them to the plexiglas and coat with mold release. Very very important to coat the silicone areas good and use the correct mold to mold release or you will just be encapsulating the body in silicone.
|
|
|
|
Post by GTS on Feb 8, 2020 15:51:26 GMT -7
Wow !
|
|
|
|
Post by AJR on Feb 8, 2020 16:49:04 GMT -7
Second half has been poured and is in the pressure pot. I will take it out tomorrow at 5:30 and if there are no issues, I will have a brand new '94 Beretta Pro Street/Mod mold ready for casting   Here are a couple of random pictures. Here are a couple of random pictures.
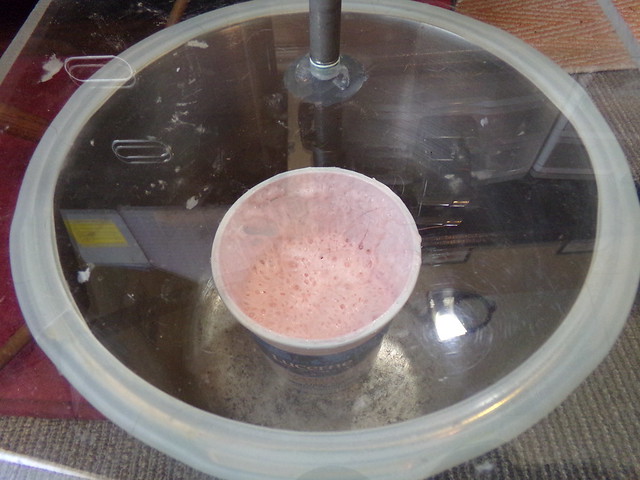
This is the mold silicone boiling in my homemade vacuum chamber. When I first turn on the vacuum pump, the silicone boils all the way up to the top of the container and then collapses to what is in the picture. I leave it in there for about 2 minutes. The bubbles completely disappear when I break the vacuum. The silicone will be bubble/air free.

This is the two parts of the mold material on the scale ready to be mixed. The measurements need to be exact and mixed very well or the silicone will not cure properly. I can't wait till tomorrow.
|
|
|
|
Post by AJR on Feb 9, 2020 16:46:51 GMT -7
OK........the time has come to take everything out of the Lego blocks and open the molds up. I want to try and do a casting this evening, but not sure if I'm going to get to.

The silicone mold removed from the Lego mold block before separating the halves.

Here they are separated. I take a Qtip and clean any residual clay and soft silicone from the mold...especially the inside part. That is the outside of the body. Anything left there will be in the casting. Mold looks good! 

The last thing I do is cut some channels into the sides being very careful not to cut into the body portion. This will help give the excess resin a place to go. This is called a "squish" mold. The two halves are laid out and mold release applied. The resin is poured into the concave half and then the mold is put together. The excess resin squishes out the sides. I will do a quick tutorial on that later. There are some tricks to fighting the dreaded air bubble.

Here is the accessory mold opened up and ready for use. This is a new way of doing the blower and scoops. Hoping it works out better and will be more consistent. I am small time....one mold at a time. I only have one vacuum chamber and one pressure pot. I hope this maybe inspired a few people to give casting a try.
Here is the link for Smooth-On products. They have a great website with a lot of of How To videos and info.
www.smooth-on.com/
|
|
|
|
Post by GTS on Feb 9, 2020 17:25:46 GMT -7
Yup! Sold me! Thanks Jeff  I'm sure I'll have questions as I go  .
Are there any pictures of your pressure pot & vacuum chamber already posted?
|
|
|
|
Post by AJR on Feb 9, 2020 18:20:11 GMT -7
Yup! Sold me! Thanks Jeff  I'm sure I'll have questions as I go  . Are there any pictures of your pressure pot & vacuum chamber already posted?

This is my vacuum chamber setup. It is a pressure cooker. I bought the 3/4" acrylic online....drilled and tapped it for the gauge and fittings (carefully)....and presto a vacuum chamber. The pump is from my days as an HVAC tech. 6cfm is a bit overkill for this, but it works great! Fittings can be picked up at Home Depot or a plumbing store. I think this is where I got the acrylic freckleface.com/
Complete vacuum chambers shopbvv.com/

My pressure pot is a painters pot. I had to replace the fittings for what I needed. Plugged one of the openings and piped in a gauge, shut off, and schrader valve. Both vacuum and pressure systems have worked flawlessly!
|
|